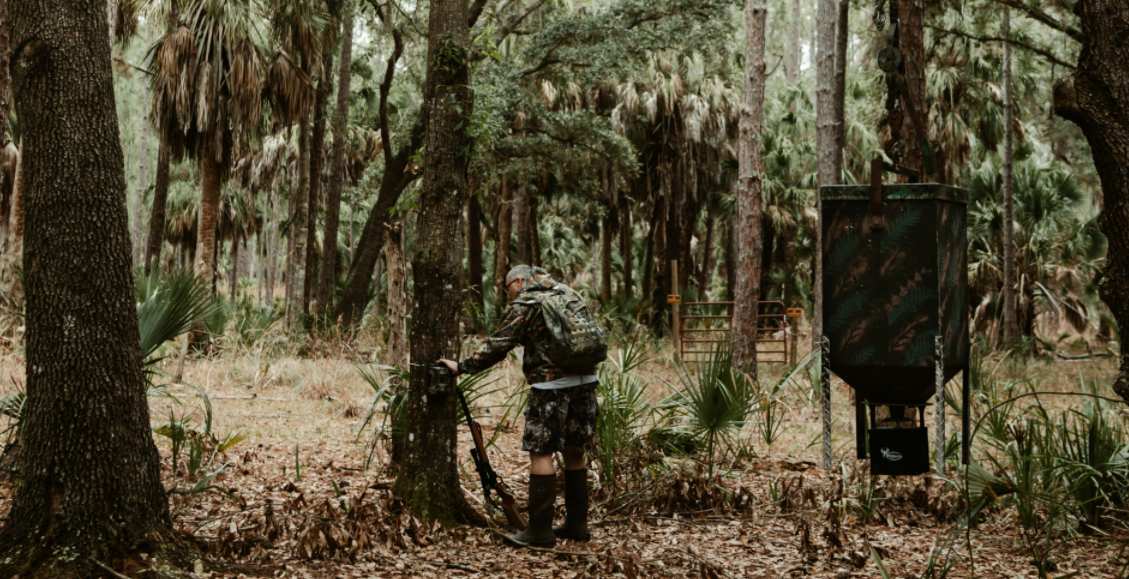
For many hunters, sitting in a tree stand is better than anything about autumn. It improves your visibility, blocks your scent from the enemy, and allows you to shoot more safely.
Yet, having such height comes with certain dangers if the job is not handled very carefully with full knowledge. Each year, many hunters fall from tree stands and suffer serious injuries or pass away because of it.
In this article, we are providing basic facts, steps to follow, and safety tips on how to use a climbing tree stand. So, you can succeed and stay safe while hunting from tree stands.
What Is a Climbing Tree Stand?
Climbing tree stands are for hunters to use. These are two-part units that let a hunter reach the top of a tree by climbing. Usually, the design has a seat and armrest area at the top and a platform at the bottom for your feet.
Each section has a gripping mechanism that holds it firmly to the tree trunk. Moreover, hunters achieve this by using the top and bottom handles to gradually raise themselves up the tree like a traditional elevator.
Why Choose to Hunt From a Tree Stand?
The biggest reason to use a climbing tree stand is to ensure the hunter is higher than the ground and can enjoy some key benefits:
- Enhanced Visibility: Getting off the ground allows you to see over brush and terrain, expanding your field of view and making it easier to spot approaching game.
- Scent Control: Getting above the game trails allows your scent to rise above where animals usually pass, so they are less likely to pick up your smell.
- Improved Shooting Lanes: When you are up in a tree, your shooting lanes are usually clearer because low obstacles don’t interrupt them.
- Reduced Ground Movement: If you are in a stand, you do not need to move much, so animals won’t feel threatened.
Pros and Cons of Different Tree Stands
Every sort of tree stand has its positives and negatives. To find the best gun for you, you need to recognize the main difference between rimfire and centerfire.
Climbing Tree Stands:
 |
|
|
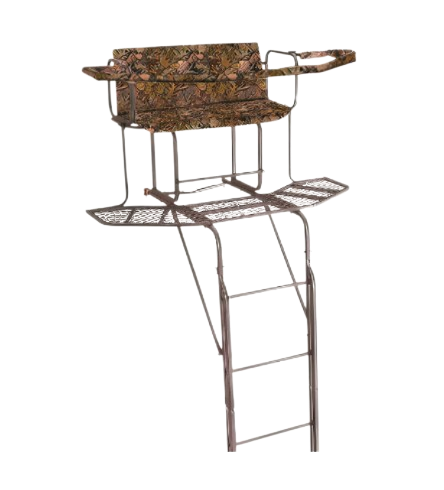
Ladder Stands:
 |
|
|
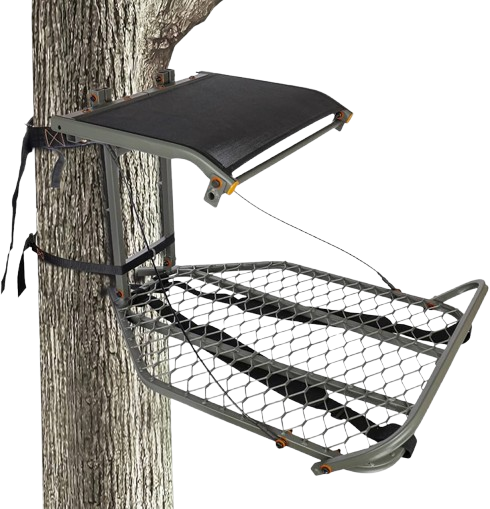
Hang-On Stands (aka Fixed-Position Stands):
 |
|
|
What to Know Before Using a Climbing Tree Stand?
Being well prepared is key to preventing accidents and to ending your tree stand hunt successfully. You should pick proper tools, determine the best tree and area, and collect necessary supplies.
Choosing the Right Climbing Tree Stand
Because your stand is so essential, finding the best one matters a lot. These points should be kept in mind:
- Weight Capacity: The weight capacity should be your priority. Make sure the stand can handle a load greater than what you and your gear will weigh when you go hunting. Don’t place loads in your vehicle that go beyond what the manufacturer recommends.
- Comfort: Since you will spend a lot of time in your stand, it must be comfortable. A stand that features a comfortable seat, a backrest and an area for you to move around is easiest to use.
- Ease of Setup: Familiarize yourself with the setup by placing and locking bits on the ground many times. Pitching a stand that is loud or tricky in the dark or cold would not be convenient.
- Portability: If you are going to trek far into the woods with your stand, pick one that is lightweight and easy to move. Most of the time, compact designs are easier to move and travel.
- Budget: Tree stands have a wide range of costs. Even though low-cost items are attractive, ensure you value safety and good quality above all else. Carefully balance your spending and think about what is safest.
Choosing the Right Tree
Choosing the perfect tree is very important for the success and safety of your hunt.
- Perfect Tree Characteristics: The ideal tree will be straight, hollow inside, and maintain a close to uniform diameter. Most climbing stands work best when the diameter is between 8 and 20 inches. It’s best to avoid trees with a very wide base and a narrow top, as they often wobble.
- Recommended Tree Species: Commonly, oaks, maples, and hickories are chosen since their wood is dense and strong. Keep away from pines as a base unless they are very grown and the bark is tough, as the plate holding them may become slippery.
- Avoid: Picking tree types that are losing their bark, have broken branches, or seem to have diseases. Be sure to avoid trees that won’t work well with how your stand is designed. Safety comes before everything, so don’t pick a tree that is unhealthy or seems unsteady.
Choosing the Right Location
Strategic placement of your tree stand is crucial for success. So, where is the best place to put a tree stand?
The first thing to consider is visibility. Make sure you are stationed in a place where you can quickly see any targets, but close enough to cover yourself with vegetation.
Next, knowing the wind’s direction is essential. Check the wind before you move to avoid your smell reaching any animals approaching. Wind blowing sideways or away from the animal’s path is the best condition for your shot. Do not set up your position so that the wind blows towards where you hope to see the game. See how to use milkweed to detect wind direction in the field.
You must spot active animal trails, various lines made by animals, scrape marks, and resting areas to look for evidence. If you stand close to these routes, you are more likely to see a game.
To find wild animals, making advantage of food plots, nearby fields, water sources and food trees or plants should be highly beneficial.
Anyway, to identify Prime Spots before setting up your tree stand, you can focus on the following:
- Pre-Season Scouting: Before the season starts, check your hunting area. Watch for new footprints, feces, scratches on trees and rubs on branches.
- Trail Cameras: Set up trail cameras to help you keep an eye on animals and note where they like to travel.
- Topographical Maps and Aerial Photos: Analyze topographical maps and aerial photos. This is to determine what kind of landscape the animals are likely to travel through.
- Observe Game Movement: See how game animals go through the area at various times of the day.
Must-Have Equipment
Safety and efficiency are paramount. Don’t head into the woods without these essentials.
- Fall Arrest Harness System (FAS): It’s always mandatory to use a full-body safety harness. Having the seat belt on is necessary from the instant your feet lift until they come into contact with the ground again. Always place the devices on your head, check the fittings, and inspect them before allowing your child to play with them.
- Lifeline/Safety Rope: You need a Kalkal safety rope to stay attached from the upper tree to your harness and safety aid. This ensures you’re protected if you fall when transporting from the tree to the stand or the other way.
- Haul Rope: A rope that gives you a safe way to lift or lower your firearm, bow, backpack, and equipment when you are in your stand.
- First-Aid Kit: For minor injuries.
- Communication Device: A fully charged cell phone or satellite communication device for emergencies.
Safety Precautions
Tree stand accidents are largely preventable. Understanding the causes and implementing safe practices is crucial.
Common Causes for Tree Stand Accidents
Tree stand accidents can often be traced back to a few common causes. One of the biggest issues is not using a full-body fall arrest harness system (FAS), as many serious injuries and fatalities occur because hunters skip this essential safety gear.
Even when an FAS is used, improper application can lead to accidents, whether it’s attached incorrectly, worn the wrong way, or taken off while up in the stand. Equipment problems are another concern; using old or damaged stands and harnesses can be risky.
Additionally, choosing the wrong tree can lead to trouble, especially if it’s dead, diseased, bent, or just not the right size. Rushing through the setup is another mistake that can result in errors.
Hunting alone increases the risk, as there’s no one around to help if something goes wrong. Feeling tired, using alcohol or drugs, or being unwell can also make climbing unsafe.
Lastly, carrying heavy bags can distract you and make the climb more challenging, further increasing the chances of an accident.
Summary:
- Not Using a Full-Body Fall Arrest Harness System (FAS): Most serious injuries and deaths are linked to people not using FAS.
- Improper Use of FAS: An accident can occur if you do not use FAS the right way. Also, it is attached improperly, worn wrong, or removed during your stay on the mountain.
- Faulty Equipment: Setting up with stands or using harnesses that are too old or damaged.
- Improper Tree Selection: Planting a tree that is already dead, suffering from disease, bent, or either tiny or very large.
- Rushing the Process: Trying to complete the setup fast can lead to errors.
- Solo Hunting: You have no backup when an accident occurs.
- Worn Out: Making a climb while feeling tired, after using alcohol or drugs, or when ill.
- Having Too Much Load: Bringing heavy bags caused a loss of focus and made the experience harder.
Recommended Safe Practices
The most recommended and safest method for climbing with a tree stand is the Alternating Section Method. While wearing your full-body fall arrest harness system and a lineman’s belt.
Before You Start:
- Never remove your FAS from the moment you leave the ground until stepping back down.
- Make sure to check every part of your stand, any ropes, and all other attachments for damage.
- Clear away any leaves, branches, or other debris that is close to the tree’s roots.
- After completing your prep tasks, tie the haul rope onto your firearm/bow and other supports. So, you can pull it up once you’re in place.
Steps to Use Alternating Section Method:
- Attach Lineman’s Belt: Connect your lineman’s belt to the tree and the harness so that you don’t need to hold onto the rope.
- Position Stand: Fully extend the foot platform of the climbing stand so that it is flat against the trunk right at ground level.
- Step Onto Platform: Carefully step onto the foot platform, ensuring your weight is centered.
- Raise Top Section: Lift the upper section of the seat upwards using your hand, over the tree trunk. It stays in place when you don’t push on the accelerator.
- Lift Legs/Feet: Hold onto the top section and use your leg muscles to raise (foot platform upward by bringing your knees into your chest. A mechanism holds the ladder firm when you step fully on it with your feet.
- Repeat: Always move from lifting the upper section to the lower section as you make your way higher. Try to keep at least two hands and one foot or two feet and one hand on the ground as you walk.
- Maintain Lineman’s Belt: Slide your lineman’s belt upward on the tree when you reach a new height so it keeps you secure.
Safe Way to Bring Your Rifle Up to the Tree
Never climb with your firearm or bow in your hands or strapped to your back. This is extremely dangerous and can lead to falls or accidental discharges. You should use a haul rope for this purpose.
Once you are securely in your stand, settled, and properly tethered with your lifeline, unroll your haul rope to the ground.
Attach the haul rope to your firearm (unloaded, with the action open and safety on) or bow. Ensure the attachment point is secure and won’t interfere with the trigger or string.
Slowly and steadily pull your firearm or bow up to your stand. Keep an eye on it to ensure it doesn’t snag on branches.
Once it reaches your stand, carefully unclip it and secure it in a safe, accessible position.
Best Height for Setting Up Tree Stands
The “best” height is subjective and depends on various factors, but a general rule of thumb is 15 to 25 feet.
- Advantages of Higher Stands (20-25+ feet): Increased visibility, better scent control, and a more defined shooting angle.
- Disadvantages of Higher Stands: More challenging to climb, can feel less stable, and magnifies the impact of a fall.
- Advantages of Lower Stands (10-15 feet): Easier to climb, less intimidating, and often still provides sufficient elevation for concealment and visibility in dense cover.
- Disadvantages of Lower Stands: Less scent control, potentially limited visibility, and less advantageous shooting angles.
The right height will make you feel safe, give you great visibility, and give you confidence to climb and descend. Don’t try to go higher than you think you can handle.
Step-by-Step Guide on How to Use a Climbing Tree Stand
Using a climbing tree stand can be a game-changer for your hunting experience, but it takes some practice to get it right. Here’s a simple step-by-step guide based on what we’ve learned.
First, before you even think about climbing, do a pre-climb checklist. Inspect your stand, harness, and ropes, and make sure your full-body fall arrest system (FAS) is on. Don’t forget to check your haul rope and pick a good tree, clearing any debris at the base.
Next, attach your lineman’s belt around the tree. This keeps you connected while you climb, so you’re safer up there. Position the foot platform of your stand against the base of the tree and make sure the harness is level. Grab hold of the trunk firmly.
Now, step onto the platform. Test its strength by putting your foot on it first. Keep your weight balanced as you move. Once you’re steady, place the seat section, which is the top part, directly over the platform and against the tree.
For the climb, use an alternating method. Lift the top section while lowering your knees, then push your feet to move the bottom section up the tree. As you go, keep sliding your lineman’s belt higher. Continue this back-and-forth motion until you reach your desired height.
Before stepping fully into the stand, attach a lifeline to your harness. This keeps you secure until you’re ready to sit down. Once you’re up there, make sure both sections of the stand are level and secure. Take a moment to double-check all the straps and joints.
After everything feels good, use your haul rope to lift your gear up, like your bow or gun. Finally, settle into your stand, ensuring you’re comfortable and hidden. Keep your firearm or bow within easy reach but safely stowed. Happy hunting!
Key Takeaways:
- pre-climb inspection for gear
- attach lineman’s belt
- position bottom section
- step onto platform and keep your body weight balanced.
- position top section and begin the climb
- tie the lifeline to your harness.
- secure stand and test every strap and each joint.
- haul up your bow/gun and other things.
- get settled and check that you are comfortable and hidden.
Tips for Beginners
For beginners who have never used a tree stand, here is some tips for you to remember:
- It’s important to practice using a tree stand safely and effectively. At first, work on the ground throughout the day and gradually rise to 10–12 feet above the ground to help yourself get confident.
- Be sure to examine your stand for rust, any cracks, loose or frayed straps, and loosened bolts prior to every new season. Bring a friend on your hunt for safety reasons, and let someone know where you are going.
- Do not skip using your full-body harness, choose sturdy trees, make sure to get all ready before climbing, do not carry things while climbing, and monitor the wind and check weight limits. As a rule, stick to what the manufacturer advises.
- Make sure the stand is clean and dry once you’re done using it. Resolve to grease moving components and keep your equipment somewhere dry and cool.
- Store the harness apart, clean it often, and keep it away from both pests and chemicals. If possible, hang the stand so that nothing is thrown or damaged.
Conclusion
Hunting from a vertical perch is very effective and fun, but it needs proper respect and hard preparation to make sure it is safe. Following the proper techniques for setting up your tree stands, wearing the necessary equipment, and finding good spots to hunt.
You need to always stick to safety measures that can help you reduce most hunting dangers. Putting yourself and your health first is critical.
With good planning and sticking to your strategies, you can climb confidently, improve your hunting, and always return home safely from every trip in the deer woods. Happy hunting!

Add comment