Think the Green Weenie sounds like just another silly fly name? Think again! This unassuming fly is a secret weapon for many anglers, and this post will show you why.
We’ll uncover the Green Weenie’s surprising origins, delve into its unique design, and teach you how to tie and fish it like a seasoned pro.
Get ready to land more trout and maybe even pick up a new nickname for your fly box friend!
What Is Green Weenie Fly?
The green weenie is a very simple fly pattern that is tied to mimic almost any aquatic insect that a fish will take, such as an inchworm or caddis larvae.
The pupae are usually aquatic and slender, therefore they are easily consumed by the element. Through its bright and rich, green color the weenie gains visibility in the water, which in turn catches the attention of other fish.
It’s typically made with a minimum of materials: chenille for the body, thread to secure the materials to the magnetic part (base), and a little personal magnet.
Origin
The exact starting point of the green weenie fly is questionable, but it seems to have become popular in the 1950s in Pennsylvania, USA. Some people believe that these two flytiers Ken Igo and Russ Mowry are the inventors of this fly.
There have been numerous tales about its actual origin, his people but it probably had sprung up from the wisdom of fly fishers that landed alongside it.
Benefits
- Although rather simple, the green weenie manages to lure multiple species of fish such as trout and char, which is an impressive feat in itself.
- The fish are probably aroused by the eye-catching green color of the fly and attracted to the fly’s soft wiggling body in the water.
- The fly is the optimal one to practice for amateur fly tiers thanks to the little materials and simple style of tying.
- Green weenies can be fished in any type of water condition with the right depth and can be fished with or without weights depending on the water conditions and target depth.
- When you fish in the faster stream, add a small shot or a diving bead to the fly to keep it down and in the hitting zone. On the contrary, an unweighted green weenie fished near the surface can look like a struggling insect under calm water.
What Are The Features Of Green Weenie Fly?
The green weenie fly is all about simplicity and effectiveness. Here’s a closer look at its features:
1. Looks
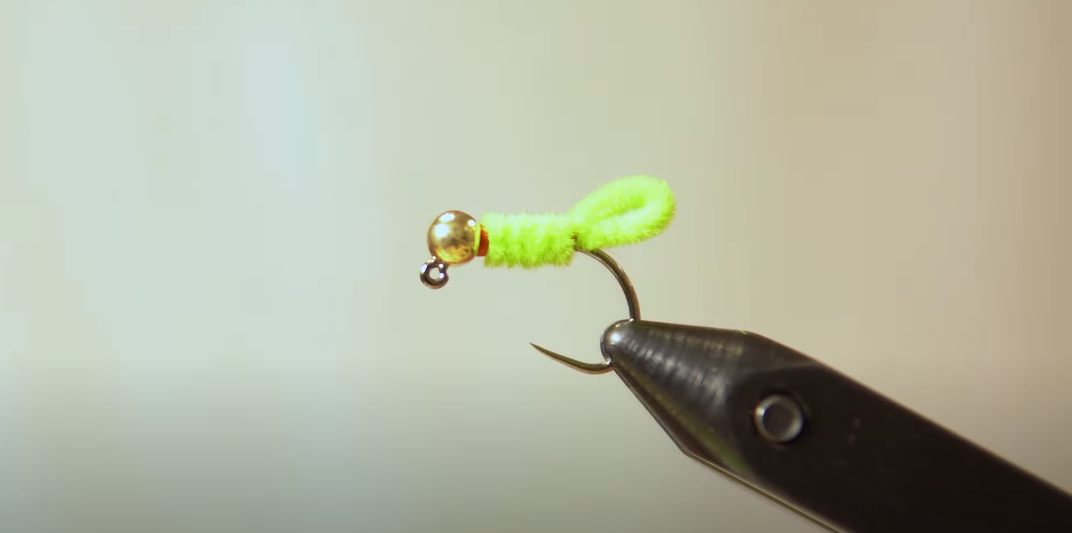
The green weenie fly boasts a striking simplicity in its design. Its most prominent feature is a vibrant green color that readily grabs attention.
This green is typically achieved by using bright green chenille, a material with a soft, fuzzy texture, which is then wrapped around the hook shank.
The result is a long, slender, green body resembling a worm or other soft-bodied aquatic insect.
2. Imitations
While not a perfect replica of any one insect, the green color and soft, segmented body can imitate various aquatic prey like:
- Inchworms: These soft-bodied worms fall into the water and struggle, making them easy targets. The green weenie’s movement in the water mimics this struggling motion.
- Caddis larvae: These green-tinged larvae live underwater and can be another food source for fish. The green weenie’s color and body shape offer a general suggestion of a caddis larva.
The bright green color acts as an attractant, catching the fish’s eye even in slightly murky water.
The use of just chenille makes it very easy for fly tiers of all skill levels to tie their green weenies.
3. Common Green Weenie Fly Patterns
- Classic Green Weenie: This is the most basic version, with just a green chenille wrapped around the hook. Variations in size are common to target different fish species.
- Weighted Green Weenie: For deeper water or faster currents, a small bead can be added to the head of the fly to help it sink and stay in the strike zone.
- Slimmer Green Weenie: Some tiers might use different-sized chenille or tie the fly with fewer wraps to create a slimmer profile, possibly imitating a smaller insect.
- Green Weenie with Thread Head: A thread head can be added behind the chenille body for a slightly different look and profile in the water.
How To Tie a Green Weenie Fly?
Tying a Green Weenie fly is a great introduction to fly tying due to its simplicity. Here’s what you’ll need and the steps to follow.
Materials you will need:
- Fly tying vice (to hold the hook securely while you tie)
- Thread (color to match or complement the chenille)
- Hook (shank length appropriate for your target fish species, size 8 or 10 are common choices)
- Chenille (bright green, size to match the hook)
- Bobbin (to hold and dispense thread)
- Scissors
- Optional: Bead (small, for weighted version)
Steps to make a green weenie fly:
- Attach the hook and thread: Secure the hook in your vice and tie the thread onto the hook shank just behind the eye of the hook. Wrap the thread a few times to create a firm base and trim the excess thread.
- (Optional) Add weight (bead): If using a bead for a weighted fly, slide it up the thread and position it near the hook eye. Secure it with several thread wraps.
- Tie in the chenille: Cut a section of chenille a few inches long. Fold the end in half and place it over the hook shank, where the thread wraps the end. Wrap the thread over the folded chenille stem to secure it to the hook. Trim the excess chenille stem.
- Wrap the chenille body: Here comes the simple part. Begin wrapping the chenille forward along the hook shank, keeping your wraps tight and even. Make sure the chenille covers the entire hook shank.
- Form the body profile: Once the chenille reaches the hook eye, you can create a tapered profile for the fly by taking a few loose wraps back down the body, and then continuing tight wraps forward to form a tapered head.
- Secure the chenille and finish the fly: Wrap the thread behind the chenille head several times to secure it. Then, using a technique called a “whip finish,” create a series of tight wraps around the thread itself to form a small knot. Trim any excess thread.
- Cement (optional): A coat of clear head cement applied to the thread wraps can help protect the fly and add durability.
Now, let’s watch the video for a clear, visual understanding of tying a green weenie fish fly:
How Do You Fish With a Green Weenie Fly?
The green weenie’s beauty goes beyond its simplicity in tying. It’s also versatile in how you fish it. Here are some insights on using a green weenie fly:
Fish Species:
Green weenie can be a successful fly for a variety of fish species that feed on aquatic insects, including trout (brown, rainbow, brook), Panfish (bluegill, sunfish), Crappie, Bass (especially smallmouth bass).
Rod, Reel, and Line:
You’ll have to bring along a fly rod, reel and fly line suited to the size of the fish you want to catch.
Leader and Tippet:
Attach a leader and a tip to your fly line. The line leader is typically a thin line using a visible type receiver of the fly line that looks less noticeable to fish. The tipper, the part of the line that proceeds the fly; is smaller than the leader in most cases, to enhance the presentation.
Casting:
Understanding the basic fly cast is one of the primary aspects of placing the fly correctly in the target water.
Dead Drift:
A popular method for catching the green weenie fish is dead drift tilling. In this technique, you launch the fly upstream and let it drift naturally downstream with the stream imitating an insect that fails to get away from the water. Pay attention to your fly ‘fly’ line or any movement of the indicator that may signify a hit (fish taking the fly).
Variations:
All the time the condition of the water and the target depth matter, so you can regulate your technique:
- Weighted Green Weenie: In faster currents or deeper water, a weighted green weenie (with a bead) can help it sink and stay in the strike zone.
- Shallow Water: For shallower water, an unweighted green weenie fished near the surface can imitate a struggling insect on top of the water.
- Double Fly Setup: Some anglers like to use a double fly setup, with a green weenie trailing behind a dry fly. This can entice fish that might be attracted to the dry fly but take the green weenie as a subsurface offering.
When And Where to Use
The Green Weenie fly is most effective during the warmer months, particularly from mid-May to early October. It can be effective in different water environments, even moving water.
When in Spring and Summer, insects like inchworms and other insects may fall into the water from dripping trees. Fish will actively feed on these insects in the water. At this time, using Green Weenie fly to intimate inserts can be effective for successful fishing.
During Autumn, water temperatures decrease and fish will get ready for their last meal before winter comes. It is also a great option for fishing with the green weenie fly.
Tips For Using Green Weenie Fly
Match the hatch: If your goal is to maximize your chances of success, you will need to know what kind of creatures inhabit the water you’re fishing. This way, you can choose a green weenie size and hue that imitates them as closely as possible.
Presentation is key: You will have a higher probability of hooking a fish with a good realistic drift without much drag and splash.
Experiment with retrieves: While the dead drift is frequent, you also can do a short slow pulling of the fly to add some movement and interest the fish which are curious to see what it is.
Vary your depth: Cast upstream and mend your line (flicking slack upstream) to control the depth where your fly is drifting.
Conclusion
Though the Green Weenie is popularly known for its amusing name, it’s a real fly for real fly fishers. This basic fly is easy to tie and works well against several fish species.
Using a bright green color and soft body it creates a replica of freshwater insects. The green weenie can be fished in different ways depending on the water conditions, making it a versatile fly with diverse uses.
Therefore, be informed that the Green Weenie is not all about the name, rather it is a great item for your fly box.


Add comment